
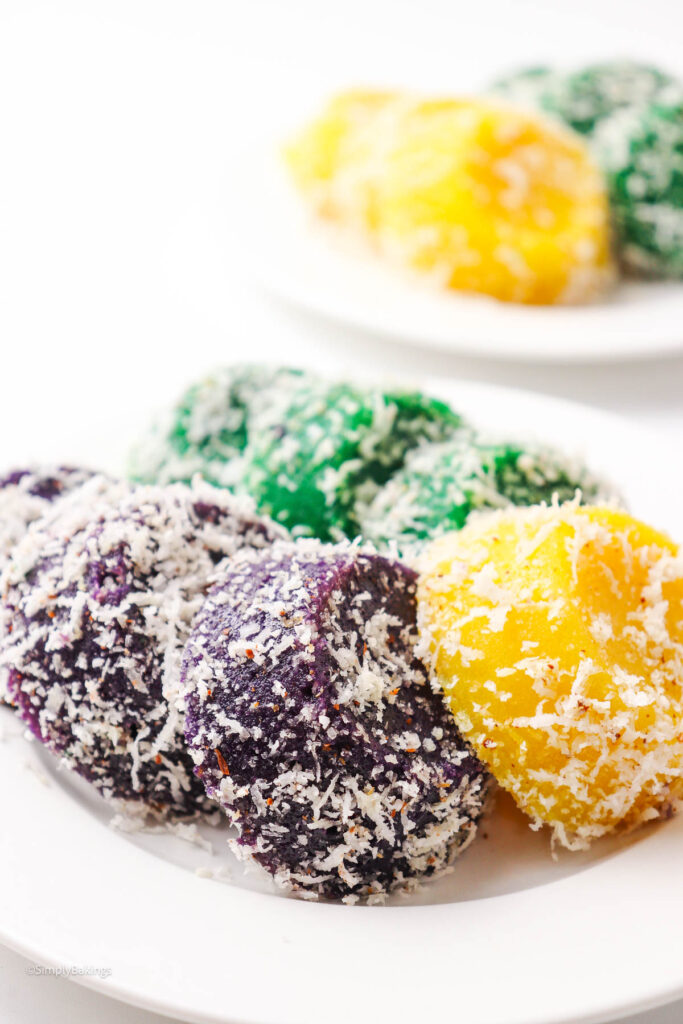
Pichi Pichi is a beloved Filipino kakanin known for its soft, chewy texture and lightly sweet flavor. Commonly enjoyed during merienda, family gatherings, fiestas, and celebrations, this traditional Filipino dessert is made with cassava and coated in freshly grated coconut for a simple yet comforting treat.
Looking for more Filipino desserts? Check out my Ube Biko, Buchi, and Buko Pie recipes!
What is Pichi Pichi?
Pichi Pichi is a traditional Filipino dessert made from cassava, a root crop that is easy to grow. Cassava was introduced to the Philippines by Spanish colonizers in the 16th century, and it became an important food source because it grows well in the country’s tropical climate. Over time, Filipinos used cassava to create many delicious dishes, including Pichi Pichi.
This Filipino snack likely started in areas where fresh cassava was common, like Luzon or the Visayas. Filipinos flavored it with pandan leaves, which give it a sweet, fragrant smell, and coated it with grated coconut, another ingredient widely used in Filipino cooking. The chewy texture comes from steaming the cassava mixture, and some people add lye water to make it even firmer.
This Filipino delicacy shows how Filipinos turn basic ingredients into something special and delicious. Pichi Pichi is more than just food for special occasions - like suman, palitaw and cassava cake, it’s part of Filipino culture and tradition!

Substitutions
- Cassava - grate and steam sweet potato as an alternative with a slightly different texture.
- White sugar - honey or maple syrup can work but reduce the liquid in the recipe slightly. Brown sugar is also fine.
- Ube flavor - use beet juice or powder as a substitute or rehydrate purple yam powder and mix it into the batter.
- Buko-pandan flavor - mix vanilla and coconut extracts together to mimic the flavor. Pandan extract or Pandan water can also work.
Storage
- Store for up to 3 days.
- If coated with grated coconut, refrigerate immediately to slow spoilage.
- Place in an airtight container or wrap each piece tightly in plastic wrap to prevent drying.
Ingredients
Listed below are all the ingredients you will need:
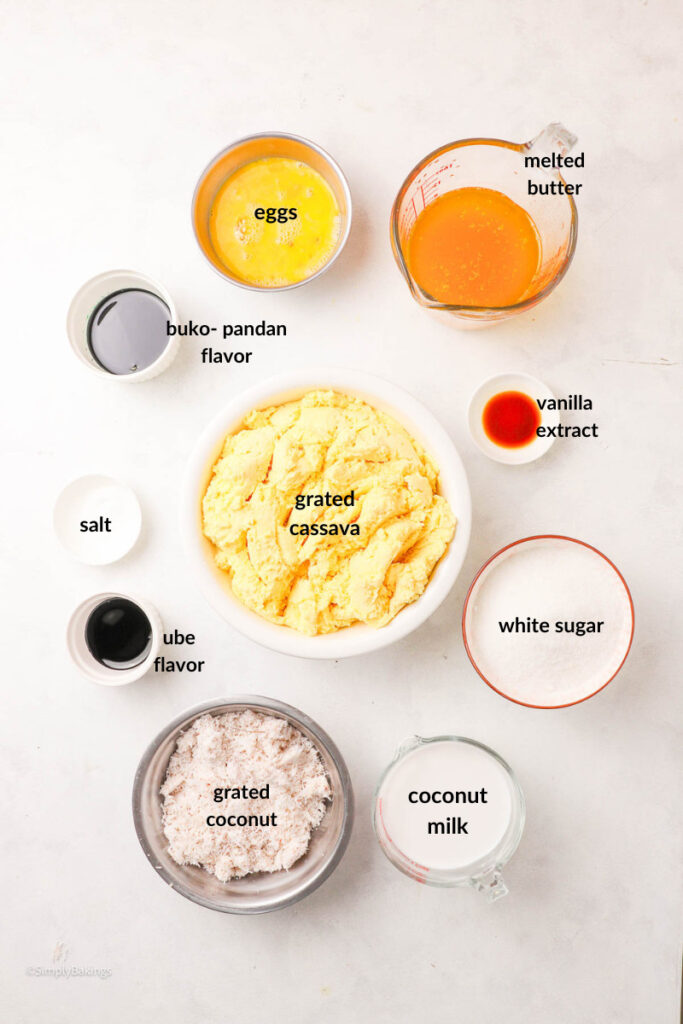
- grated cassava
- coconut milk
- white sugar
- butter
- eggs
- salt
- vanilla extract
- ube flavor
- buko-pandan flavor
- grated coconut
See the recipe card for quantities.
Instructions
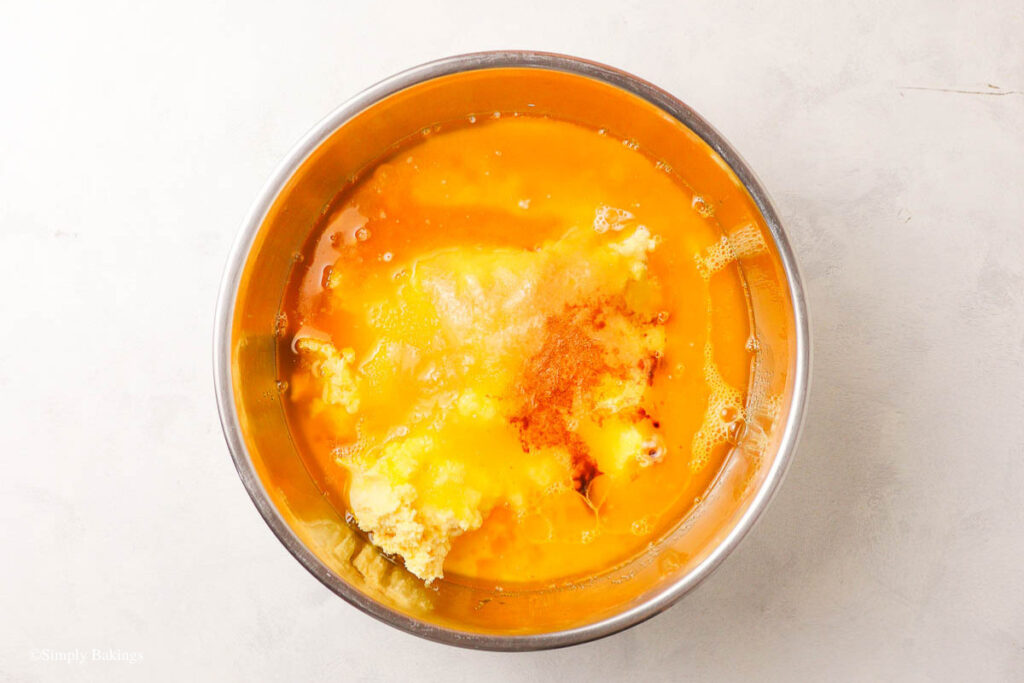
In a large mixing bowl, whisk together the thawed grated cassava, coconut milk, white sugar, melted butter, beaten eggs, salt, and vanilla extract. Give it a good mix until fully combined.
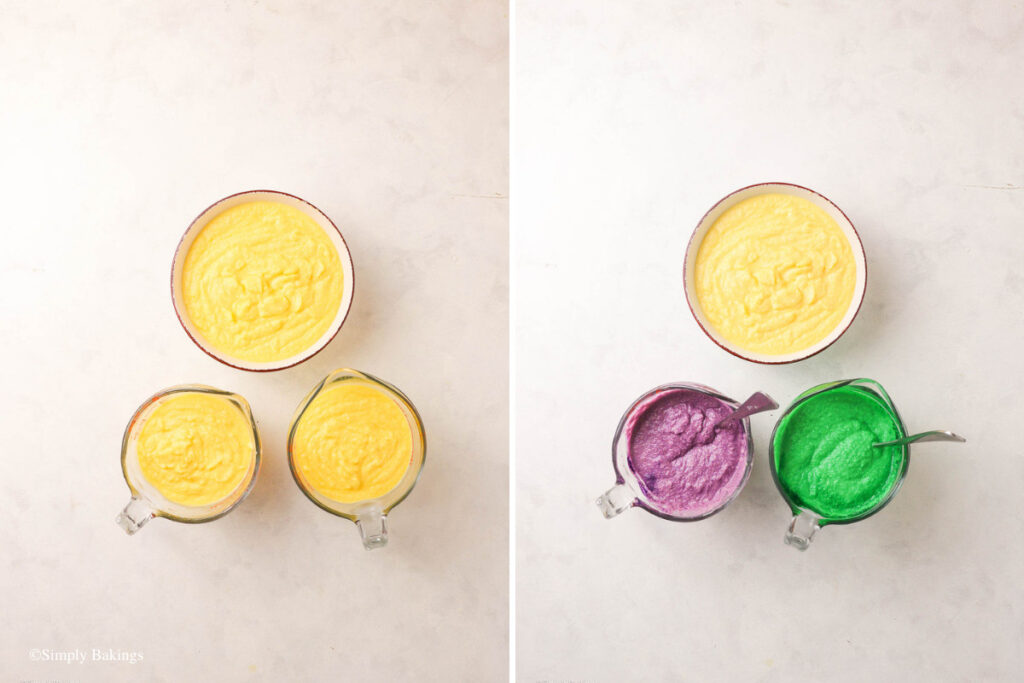
Divide the mixture evenly into three separate bowls.
Add ube flavor to one bowl and buko-pandan flavor to another. Leave the third bowl plain or unflavored. Mix each bowl until the flavors are fully incorporated.
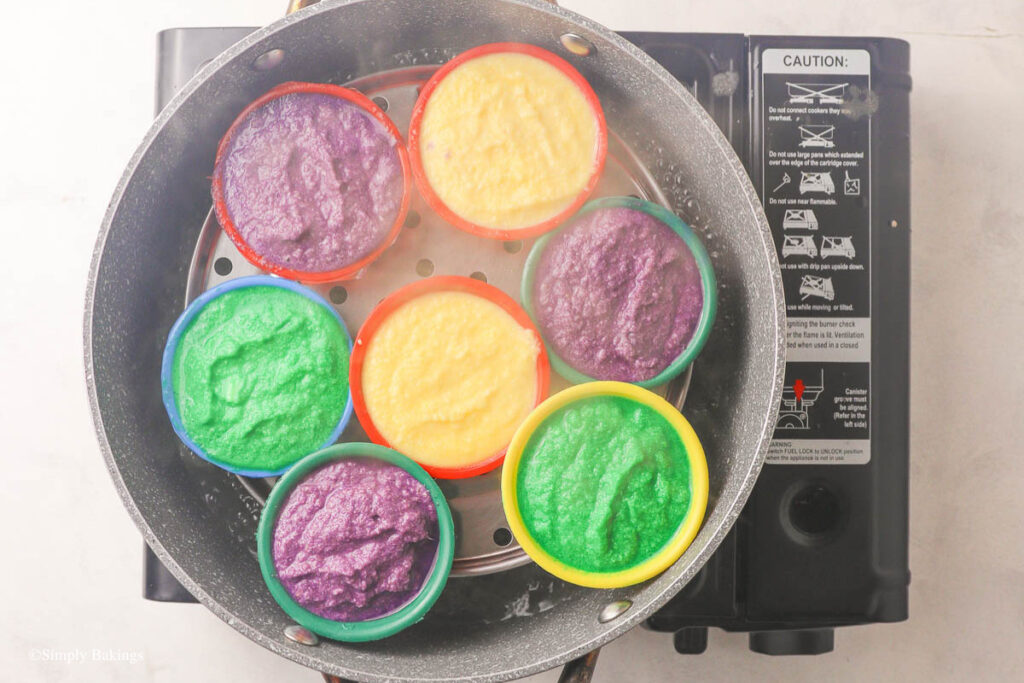
Pour or scoop the mixtures into plastic flan molds, one flavor at a time.

Bring water in a pot to a boil and set up steamer racks.
Place the molds on the racks and put back the lid. Steam for about 20 minutes, or until the mixture is firm.
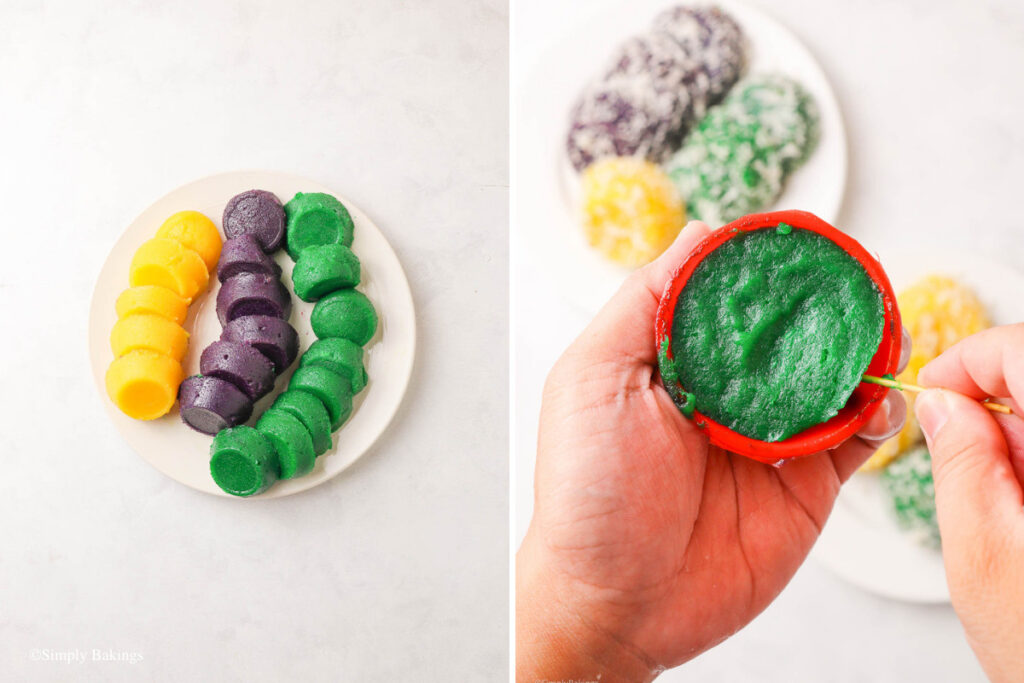
Remove the molds from the steamer and let the pichi-pichi cool completely.
Use a clean toothpick or spatula to gently remove the pichi-pichi from the molds.
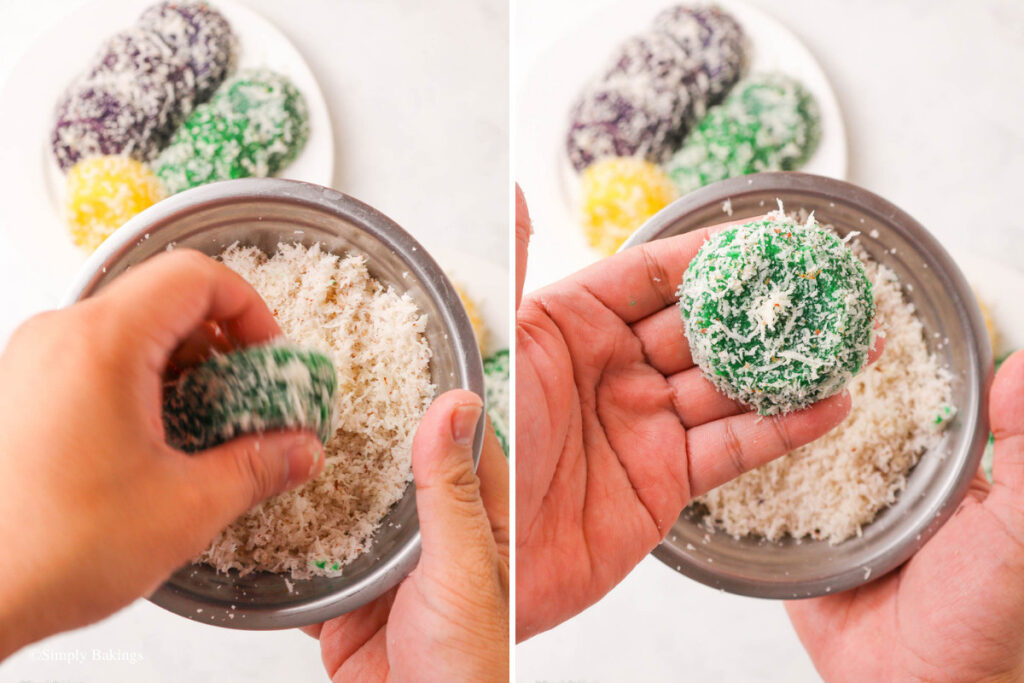
Roll the cooled pichi-pichi in freshly grated coconut.
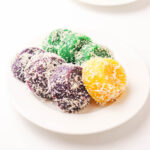
Serve and enjoy!
Hint: If coated with fresh grated coconut, refrigerate immediately, as coconut spoils quickly.
⭐ Top Tip
You can add different flavors and food colors to make it a colorful Pichi Pichi recipe!
FAQ
More Recipes
Hungry for more Filipino food? Explore these:
Pichi Pichi
Ingredients
For the Base:
- 3 cups frozen grated cassava thawed
- 1 cup coconut milk
- 1 cup granulated white sugar
- 1 cup melted butter
- 2 whole eggs beaten
- ¼ teaspoon salt
- ½ teaspoon vanilla extract
For Flavoring:
- 2 teaspoons ube flavor
- 2 teaspoons buko-pandan flavor
For Coating:
- 1 cup freshly grated coconut
Instructions
Prepare the Base Mixture:
- In a mixing bowl, whisk together the thawed grated cassava, coconut milk, white sugar, melted butter, beaten eggs, salt, and vanilla extract. Mix well until fully combined.
Divide and Add Flavors:
- Divide the mixture evenly into three separate bowls.
- Add ube flavor to one bowl and buko-pandan flavor to another. Leave the third bowl plain or unflavored. Mix each bowl until the flavors are fully incorporated.
Mold the Mixture:
- Scoop the mixtures into plastic flan molds, one flavor at a time.
Steam the Pichi-Pichi:
- Bring water in a pot to a boil and set up steamer racks.
- Place the molds on the racks and steam for about 20 minutes, or until the mixture is firm.
Cool and Unmold:
- Remove the molds from the steamer and let the pichi-pichi cool completely.
- Use a clean toothpick or spatula to gently remove the pichi-pichi from the molds.
Coat and Serve:
- Roll the cooled pichi-pichi in freshly grated coconut.
- Serve and enjoy!
Watch The Recipe Video!

Elie W says
oooo!! I have been looking for a recipe like this! Thanks Lainey!
Julius says
A classic Filipino 90s recipe and one of my all-time favorite kakanins! 😋
Sweet says
Pichi Pichiiiiiiiiiiiiiii! This is actually something I've been wanting to make at home for quite a while now. This is an easy way to make it. Thanks so much!
Sheen says
This recipe never failed to impress me. So yummy!!!
Claire M says
I would grab this second next to cassava kakanins! Haha now I am hungry
Dimple says
Filipino recipe classic! Thanks for this SB!
Aira says
This Pichi-Pichi recipe is amazing! The instructions were clear and easy to follow, making it simple even for beginners. I love how soft, chewy, and perfectly sweet the Pichi-Pichi turned out, and the grated coconut added such a nice texture. The step-by-step photos were super helpful, and I appreciate the tips on making it extra delicious. It really brought back childhood memories of merienda time with my family. Thank you for sharing this wonderful recipe—definitely making it again! 😊
Cheng says
Oh wow. This is one of my favorites! I'm amazed that this is so easy to make. Thanks for this recipe!