
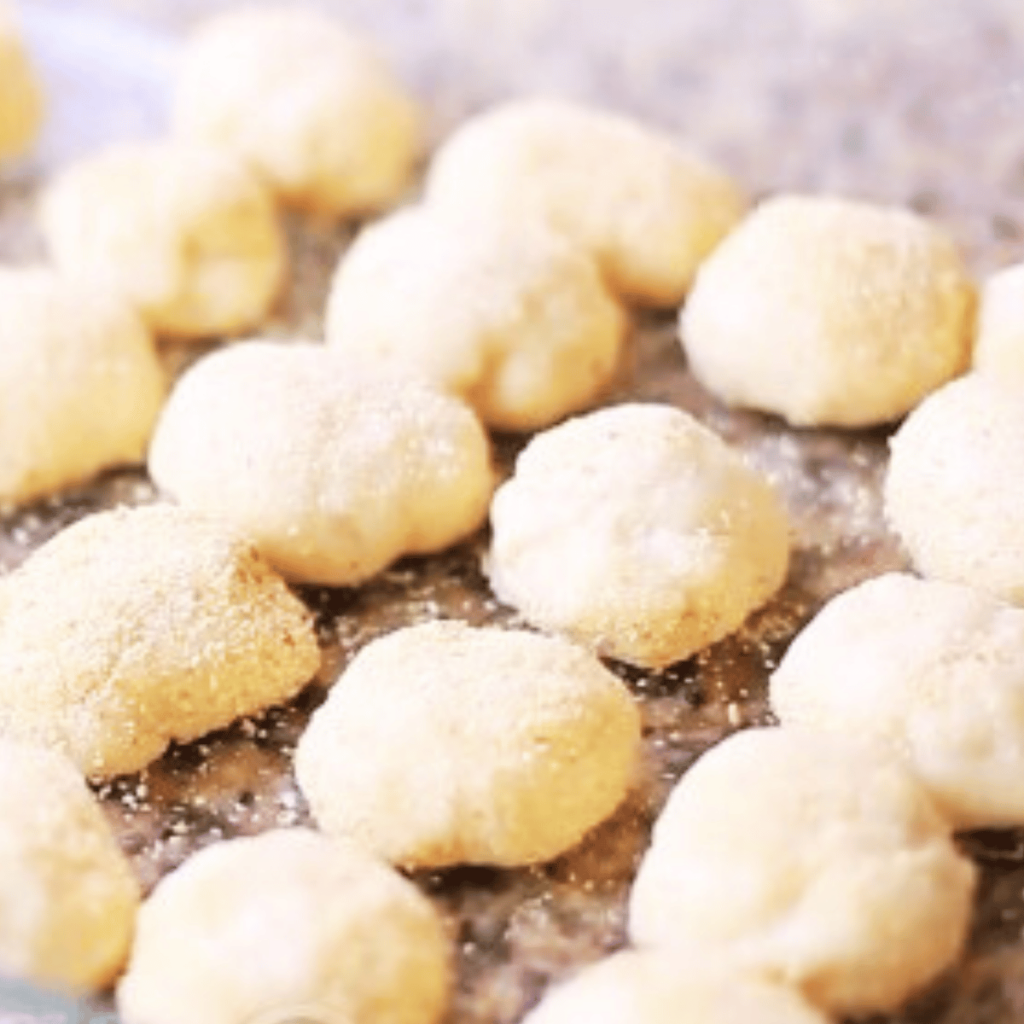
Know how to make Pandesal in beginner steps! These homemade Filipino-style sweet rolls are best enjoyed in the morning, filled with any spread or filling! It's delicious, soft, and airy and will become your favorite bread.
Love Filipino bread? Try my Ube Pandesal, Red Velvet Pandesal, Spanish Bread, or my Malunggay Whole Bread!

What is Pandesal?
Pandesal, or Pan de Sal, is the most common bread roll in the Philippines. It actually traces its roots back to the Spaniards, who introduced baking traditions during the colonial period. Originally inspired by Pan de Suelo, this Filipino adaptation uses commercial yeast and all-purpose or bread flour, making it softer and lighter.
You’ll find it everywhere—from home kitchens to local panaderias, and even sold by street vendors early in the morning. Many Filipinos enjoy their pandesal with cheese, eggs, or just plain coffee. It’s simple, affordable, and loved across all generations!
Substitutions
- Active dry yeast – Use instant yeast (no need to proof)
- Sugar – Use honey, coconut sugar, or brown sugar
- Vegetable oil – Can be replaced with butter, dairy-free butter, or coconut oil
- All-purpose flour – Use bread flour for chewier rolls, or whole wheat flour for more fiber and nutrients
Variations
- Cheese Pandesal – Add a cube of cheese inside each portion
- Egg-Stuffed Pandesal – Place a boiled egg in the center for a protein boost
- Healthier version – Use whole wheat flour and reduce sugar
- Stuffed with coconut jam – Add a local touch with sweet coconut filling
- Herbed pandesal – Add garlic, malunggay, or rosemary to the dough for a savory twist
Storage
- Countertop – Store in a sealed container for 2–3 days
- Refrigerator – Keeps well for up to 1 week
- Freezer – Freeze baked rolls for 1 month; reheat before serving
Ingredients
- warm water
- active dry yeast
- sugar
- vegetable oil
- salt
- all-purpose flour
Instructions
We will be using our hands a lot in kneading the pandesal dough so we have to wash it carefully and dry it completely:

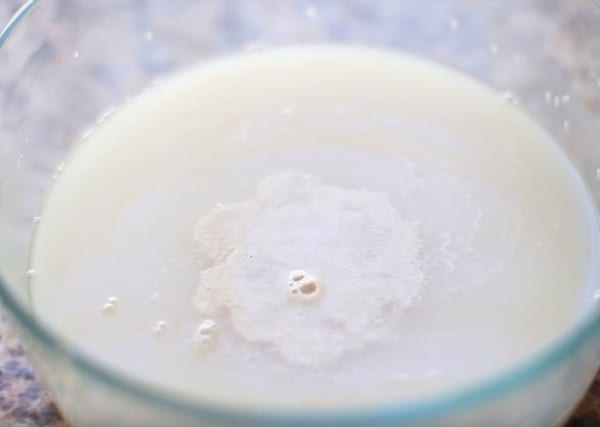
Add the active dry yeast and the 1 teaspoon of sugar to the 2 cups of warm water mix and set aside till frothy (about 5 minutes):
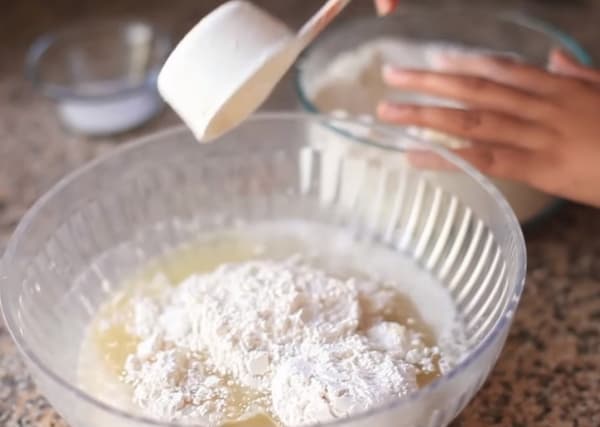
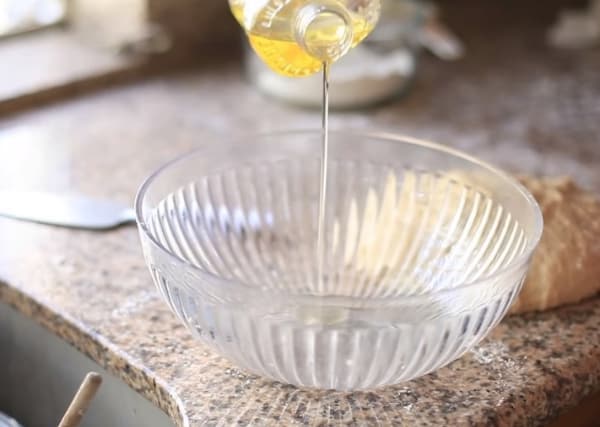
In a separate mixing bowl, add sugar, oil, salt, and 1 cup of flour then mix. Then add the active dry yeast mix to the mixture:
Important Reminder:
Gradually add the flour ½ a cup at a time. This will help you knead it properly since it will clump up if you add all of the flour at once.
Place the dough onto your clean kitchen counter so you can knead it carefully:
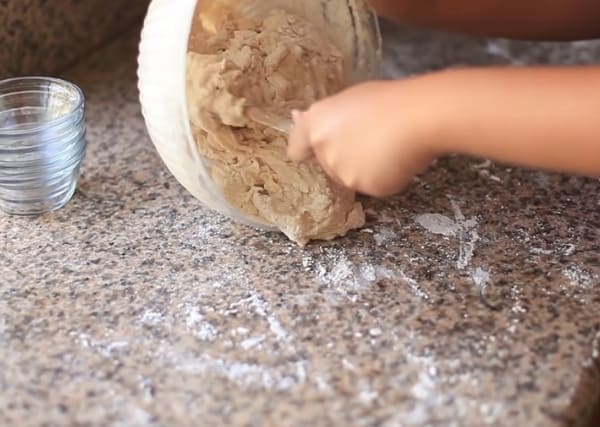
To prevent the dough from sticking to your hands while kneading, sprinkle a bit of flour on the dough or you can simply rub flour in your hands:

After kneading, place it in a deep bowl for the dough to double in size. It is important to oil the bowl so you can take out the dough easily after it has risen:
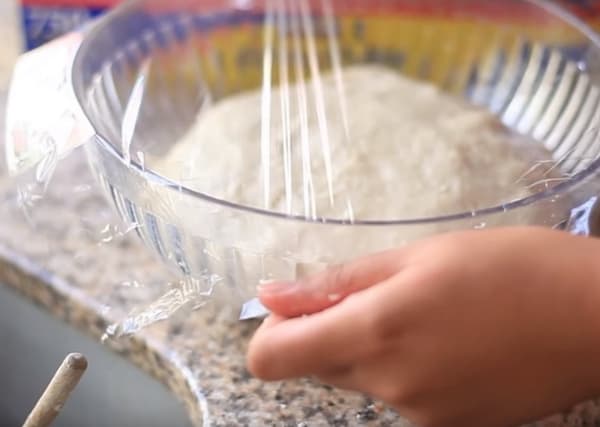
Once all the flour is mixed, set aside in an oiled bowl in a warm place until the dough is doubled (about 1 hour). Cover it with saran wrap or a damp towel:
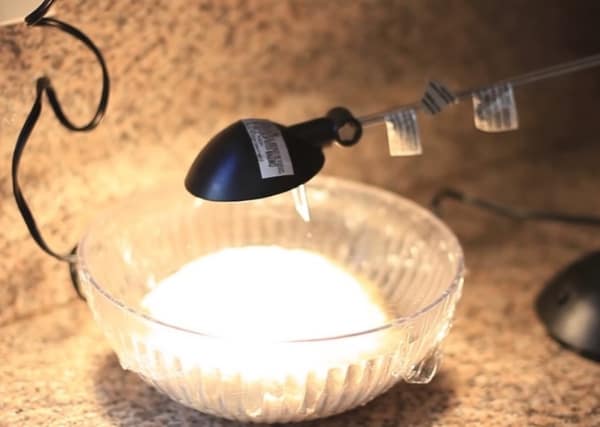
I placed my dough under a lamp so it makes the room temperature higher, as it helps the dough rise fully:
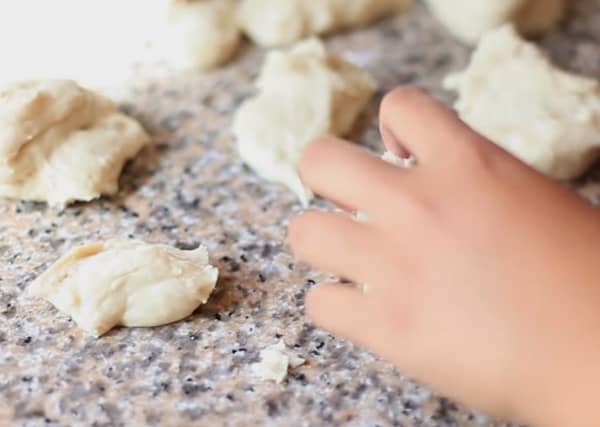
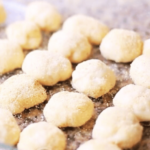
After about an hour or so, take out the dough from the bowl and put it on a floured surface. Now it's time to shape the dough into your desired sizes:
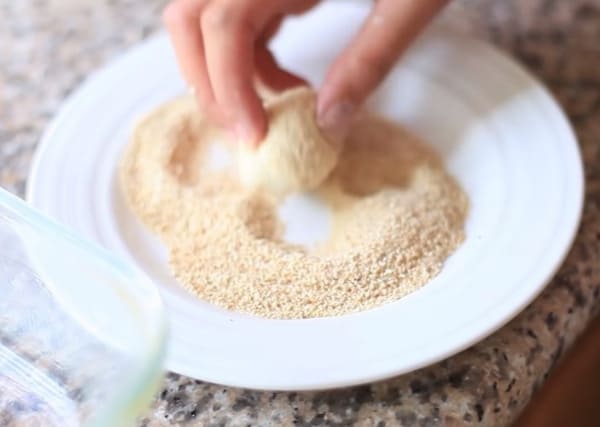
This part is optional. Most pandesal lovers want bread crumbs but personally, I do not like to coat them with bread crumbs as I make a huge mess when I eat them. (Imagine breadcrumbs all over the floor or tabletop, lol!)

After shaping the dough, place it in a baking tray of your choice, cover it and wait for it to rise again for only 30 minutes:
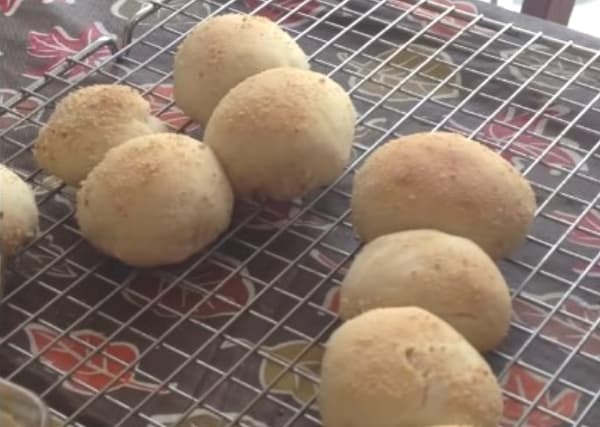
Place in oven at 375 degrees F for 20 minutes:

After the baking time, take it out from the oven and let them cool in a cookie rack:
This Filipino bread is best eaten when freshly baked. If you have a sweet tooth like me, pair it with peanut butter, condensed milk, or even ice cream!
Top Tips
- If you don't like the bottom crust of your pandesal burnt, use glass baking containers as it just makes the bottom crust lightly toasted. If you do not have glass bakewares on hand, you can avoid burning the bottom crust of your pandesal by lowering the oven temperature to 350 F instead of 375 F
- Always have extra all-purpose flour handy. It is very useful in the kneading part where the dough is very sticky and makes the kneading work a bit hard. Just coat your hands with flour or sprinkle a bit of flour on top of the dough as needed
- Check expiration dates of ingredients especially for the active dry yeast - this is the leavening agent of your pandesal so if you have an expired one, it defeats its purpose of making the dough rise
- Punch your dough! Seriously, this is a very important step after having your dough rise for about an hour. "Punching" it down removes the air bubbles inside and doing so produces a fine-textured pandesal
- Do not forget to cover your dough during the rising time - it helps speed up the rising of the dough and it prevents the dough from drying out
- What makes a longer rise time of the dough? It could be two things - your room is a little bit too cold or the yeast that you used for the dough is dead
- For a healthier alternative when greasing the large bowl for dough, use vegan butter or margarine.
FAQ
Looking for more Filipino Dishes? Check out some of my favorites:
Happy Baking!
How to Make Pandesal
Ingredients
- 2 cups warm water 110 degrees F
- 2 teaspoons active dry yeast
- 1 teaspoon sugar
- 1 cup sugar
- ⅓ cup vegetable oil
- 2 teaspoons salt
- 6 cups all-purpose flour
Instructions
- Add the active dry yeast and the 1 teaspoon of sugar to the 2 cups of warm water mix and set aside till frothy (about 5 minutes)
- In a separate bowl, add sugar, oil, salt, and 1 cup of flour then mix. Then add the active dry yeast mix to the mix.
- Gradually add the flour ½ a cup at a time.
- Once all the flour is mixed in set aside in a oiled bowl in a warm place until dough is doubled (about 1 hour).
- Shape dough to desired sizes and let it sit for 30 minutes.
- Place in oven at 375 degrees F for 20 minutes.
Notes
Kneading is important in baking bread as it develops gluten. When flour is mixed with liquid, gluten forms and binds the dough, providing a cohesive texture that helps the loaf hold its shape during baking.
Watch The Recipe Video!

I. LOVE. PANDESAL. Many of you may ask what is pandesal? Pandesal is a Filipino Bread that is fluffy and sweet. It can be eaten at any time of the time day with any kind of spread.
I grew up eating this every morning for breakfast before school. My mom would wake up early and stop by the local bread shop and pick up some pandesal and my siblings and I would eat it with Nutella. When I got older, I got so obsessed with eating pandesal that I wanted to learn how to make it so I can eat it any time of the day. I have many different versions of pandesal, but this one is the easiest one I have!
arrielle says
is it okay to use instant dry yeast than active dry yeast and how do you use it?
Lainey says
Hi Arrielle,
Yes it's ok to use instant dry yeast, same thing. Add instant dry yeast to warm water and add 1 teaspoon to active it. 🙂 Please let me know if you have anymore questions.
Dionne says
Can I use semolina instead of bread crumbs? Will it be disastrous? Will the baking time remain the same? Thanks in advance 😉
Lainey says
hi Dionne,
Sure, it should be fine. Let me know how it goes! 🙂
psalm M. andres says
hi tnx for tutorial i will use this on my training in bread and pastry thank u very muuch 🙂 hihi i hope you will upload more turtorials video's about baking a breads 🙂 THANK YOU AGAIN 😀
Lainey says
hi there, I'm glad you like the recipe! It's my go to recipe whenever I crave for bread! 😀
Franc says
Hi! The pandesal looks awesome! How many does it make in total? I'd really appreciate it if you answered, even if it's a little late.
Thanks!
Lainey says
Hi Franc! Thank you! It depends how large or how small you make the pandesal. If you make large pandesals, approximately one dozen. Small pandesals, approximately two dozen.
Anonymous says
I only have instant dry yeast. Kailangan ko pa po bang iactivate yung yeast? Kasi sabi po sa google na kahit hindi na daw po iactivate at ilagay na lang daw doon sa flour mixture kaagad. Tapos kung instant dry yeast po gagamitin ko gaano karami ang ilalagay ko at gaano katagal ang rising time? 🙂 Gagawin ko po ito bukas, sana po mag-reply kayo. ^_^
Lainey says
I like to test the yeast before I use it, but feel free to directly add it to the mixture. 2 teaspoons for instant dry yeast. Sorry for the late reply! I hope it worked out.
Arlene tamoro says
Hi! Thank you very much for posting this tutorial. I tried a making pandesal several times and actually gave up. My son, who was born and grew up here in the US (like you) just loves it. It also brings back the memories when my brother-in-law ( who passed away) would make it and the whole house would smell like it's early morning in Manila, where i grew up, when the bakeries are making it. I actually tried a different recipe and process before trying yours, but it was a disaster- then I went and look up on the web what went wrong and saw your post , and voila! My family had their first homemade pandesal. I like the way you explained everything and reasoning behind it. I don't usually post a comment but I have to give credit where it's due! Thank you again!!!
Lainey says
Hi Arlene! I'm so glad this recipe worked for you and thank you so much for sharing your story! It's always nice hearing stories and please let me know if you have any questions!
ruby says
Hello, I am just trying follow your receipt, but i am not sure what is the correct measure. 1/3 of vegetable oil or 1 cup?
Reason of my question due, i tried to make the receipt but the dough got dry and not wet as your video.
Let me know please.
Aileen says
Thank you for sharing the recipe. This is now my go to recipe for pan de sal after trying several other ones.
Lainey says
Hi AIleen,
You're welcome! I apologize for the late reply… I hope to see your Pandesal version. Please tag me photos when you bake them. 🙂
MariaMia says
Thank you for this simple pandesal! I tried it for the first time and it turned out good. I was predicting that my batch was a disaster because the dough wouldn't rise (too cold inside the house) and that after rising, it was sticky. I pulled out the sticky dough and I thought about the carbon dioxide that escaped. "Oh my goshes!" as what my 2 year old would say. I just went with it and hoped for the best. Turned out good and yes, this pandesal is very forgiving:) I am your new fan! Thank you again!
Lainey says
awww! I am so happy that it turned out great!!!!!! (: Thank you for sharing your story! hahah (: <3 xx
Chengs says
Can I try it with cake flour? We don't have plain flour here :3
Lainey says
Hi Chengs,great question. Check out this article: http://yumarama.com/4266/all-flours-not-equal/. (:
Anonymous says
I tried this recipe and it was perfect. Thank you.
Cess says
why do we have to use bread crumbs in making pandesal?
Lainey says
We have to use bread crumbs so that there will be crust after it was baked and a little crispier outside. 🙂
Reinie Rose Agao Herrera says
This is awesome. 1st time tried and it comes perfect. Thank you so much. God bless.
Reinie says
This is awesome. 1st time tried and it comes perfect. Thank you so much. God bless.
Sheree says
Just tried this recipe....it smells good, looks good, taste good but it’s a little dense not fluffy inside. What did I do wrong?
Thanks!
Lainey says
Hi Sheree,
Yay! I'm glad it smelled delicious, but the taste is even better!
This Pan De Sal Recipe is a little bit on the dense side which I think it makes it even better. 🙂
Glendale says
Amazing! This is so yum!
Lainey says
Hi Glendale, I’m glad you like the recipe! 🙂
Rita says
I’m Using gluten free all purpose flour. Anxious to see if it works. I love the look of the pandesol bread. I’m also going to leave off the bread crumbs. I don’t know what I will use instead maybe egg white or just better. I’ll let you know how it works
Lainey says
Hi Rita, sorry for the late reply. Hope it turned out well! Thanks for using my recipe.
Julius says
Wow, here is the pandesal recipe that worked for me! my family loved it, thanks Lainey!