
These amazing Ice Cream Cone Cake Pops are a breeze to make, look fantastic, and are perfect for any celebration, especially in the summer. Using cake mix, soda, some pink chocolate, and sprinkles, these come together in a snap!
Looking for more summer recipes? Try my Boston Cream Cupcakes or my Easy Chocolate Ganache Blondies.

Top Tip
- Add sprinkles or other decorations while the candy coating is still wet so they stick better.
Substitutions
- Cake flavors: Use any flavor you like, such as chocolate, red velvet, or vanilla cake.
- Soda: Any soda can work. Try Sprite, Coke, or even flavored sodas like orange or root beer.
- Candy Melts: Substitute with melted chocolate chips or almond bark.
- Cones: Use mini waffle cones or sugar cones for a different texture.
Variations
- Rainbow Swirl: Use different colored cake batters to create a rainbow effect inside the cones. Finish with a vanilla or white chocolate coating and rainbow sprinkles.
- Cookie Crunch: Mix crushed cookies into the cake batter before baking for a crunchy texture. Dip the cake pops in chocolate and roll them in more cookie crumbs.
- Fruity Surprise: Add small pieces of fresh fruit, like strawberries or blueberries, to the cake batter before baking. Coat in white chocolate and top with fruit-flavored drizzles.
Storage
- Immediate Consumption (1-2 days): If you plan to consume the cake pops within a day or two, store them at room temperature in an airtight container away from heat and sunlight.
- Short-Term Storage (3-4 days): For slightly longer storage, refrigerate the cake pops. Place them in a single layer in an airtight container to prevent drying out.
- Extended Storage (Freezing): Extended Storage (Freezing): If you want to store them for several weeks to a month, freeze the cake pops individually wrapped in plastic wrap or in freezer-safe bags.
Ingredients
Listed below are all the ingredients you will need:
- funfetti cake mix
- soda
- frosting
- shortening
- mini ice cream cones
- pink candy melts
- sprinkles
Instructions
Preheat oven to 350F and grease 9x13 cake pan.
In a large bowl or a stand mixer, add cake box mix, soda, and mix until well combined:
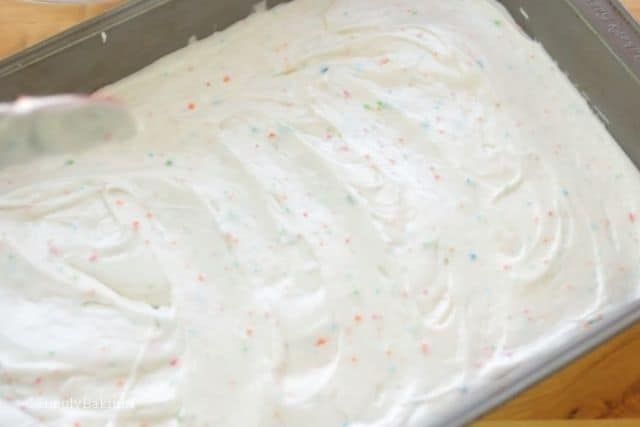
Carefully pour the batter into the baking pan, making sure it's evenly distributed. Bake in the oven until the top looks golden brown, which usually means it's cooked through. You can also check by sticking a toothpick into the center—if it comes out clean or with just a few crumbs, your cake is done:
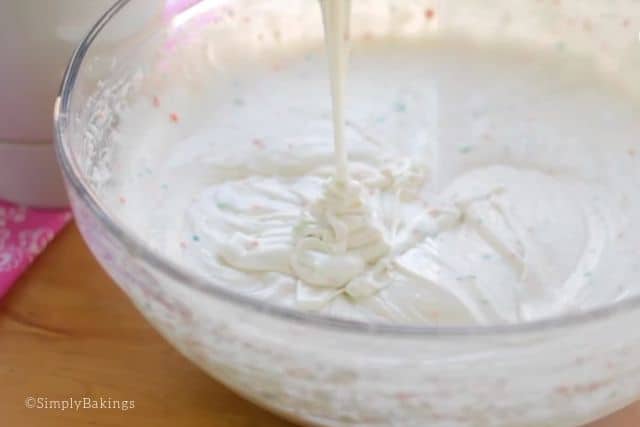
Allow the cake to cool for a minimum of one hour. Once cooled, crumble the cake using a fork until it reaches a fine consistency. Gradually add a few spoonfuls of frosting to the crumbled cake until it binds together smoothly:

Roll cake crumbs into your hands and form into cake balls:

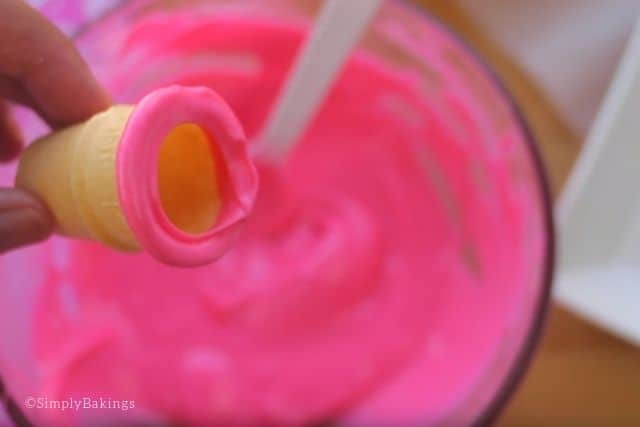
After rolling out all the cake balls, it's time to melt the candy melts. If necessary, add a bit of shortening to achieve the desired consistency. You can melt in microwave, at 15 second increments if using a high powered microwave. Feel free to pick any color that sparks joy for you! Personally, I love using pink:

After you have achieved the right consistency of the chocolate or candy melt, dip the cone into it, making sure to coat all the areas where the cake pop is to be attached:
After attaching the cake pops into the cone, let it sit for a few minutes to give time for the melted chocolate to harden:

After you are sure that the cake pops won't fall off the cone, you can start dipping it the melted chocolate or candy melts and decorate with sprinkles as you please 🙂

There you go, Simply Bakers! You have just made such pretty desserts using just a few ingredients!

FAQs

Ice Cream Cone Cake Pops Recipe
Ingredients
Making the Cake
- 1 (15.25) oz funfetti cake mix
- 1 ½ cups sprite soda (1 can of soda)
- 2-4 tablespoons vanilla frosting or your favorite
Decoration
- 2 teaspoons shortening
- 3 cups candy melts
- 24 mini ice cream cones
- sprinkles
Instructions
Cake
- Preheat oven to 350F and grease 9x13 pan.
- In a large bowl add cake box mix, soda and mix until well combined.
- Pour into pan and bake for 25 -30 minutes and allow to completely cool for at least one hour.
- Once cooled, crumble the cake using a fork until it reaches a fine consistency. Gradually add a few teaspoons of frosting to the crumbled cake until it binds together smoothly. Then roll cake crumbs into your hands and form into cake balls, set aside.
Assembling the Ice Cream Cones
- In a bowl, add candy melts and shortening in the microwave, at 15 second increments.
- Once your candy melts have reached the desired consistency, dip the cone into the melted mixture, ensuring all areas where the cake pop will be attached are coated. Then, position the cake ball where the candy melt was applied. Allow it to sit for about 5 minutes or until firm.
- Next, once the cake ball is firmly attached to the cone, dip it again into the pink candy melts, gently tap to remove any excess chocolate, and generously add sprinkles. Allow it to stand until the chocolate firms up.
- Serve immediately.
Watch The Recipe Video!


Icy says
How many cake pops can I make from this recipe? 😛
Lainey says
You can make a little more than 2 dozen cake pops. 🙂
Glendale says
Wow! I need this recipe!
Lainey says
Hey Glendale! Thanks so much for visiting my blog! Go grab this recipe!
martha torres says
What flavor of soda I can use for the receipt Sprite or any kind
Lainey says
Hi Martha! Thanks for asking. Yes, any soda. Sprite can do, it would be delicious! Don't hesitate to tag me when you make them.
Rabs says
How much in advance can I make these ice cream cone cake pops without the cone getting stale or soggy? How do I store them to prevent this?
Lainey says
Hi Rabs,
You can make ice cream cone cake pops in advance without the cones getting stale or soggy by following these storage tips:
Room Temperature (Short Term): If consuming within a day or two, store at room temperature in an airtight container. Keep away from heat and moisture.
Refrigeration (Medium Term): For longer storage (up to 3-4 days), refrigerate in an airtight container. This helps maintain freshness and prevents the cones from becoming stale.
Martha says
My 4 year old great granddaughter loves to bake for her Alzheimer's fundraiser. We just made these cake pops with chocolate cake mix and Dr. Pepper. They were so easy and delicious! I didn't have candy melts on hand so she made up some frosting to try them out. This will definitely be on her next year's fundraiser! Is there any way I can send you a picture of Lia's Sunshine Bakery creations?
Lainey says
Oh wow. That's great! Kindly send the pictures to my IG or FB. I would love to see her creations. Keep it up!
Millie W says
Love how easy this recipe is! I changed it up and used chocolate cake and it tasted amazing! thanks!
Lainey says
Thank you, Millie. I appreciate you trying out this recipe. I'm glad you did some tweaks and turned out amazing. Well done! 🙂
Julius says
10 scoops for me, please. 😊
Lainey says
Sure! haha. Enjoy! 🙂
Lainey says
Thanks for dropping by, Julius. I appreciate it! 🙂